多 UIScrollView 下点击状态栏回到顶部
iOS 下 UITableView/UIScrollView 有个特性:点击状态栏回到顶部。如果当前 view 下有多个 scrollView,或者多个 tableView 嵌套,点击回到顶部就无效,因为系统不知道该响应哪个,索性就全部禁用。文档:
On iPhone, we execute this gesture only if there’s one on-screen scroll view with
scrollsToTop== YES. If more than one is found, none will be scrolled.
找到了原因解决也就很简单:只保留需要点击回到顶部 scrollView.scrollsToTop = YES,其他全部禁用。
就这么简单的 tip 我也是最近才知道,而解决办法就在官方文档里,so RTFM first.
终端下 Vim 粘贴缩进错乱
终端下 Vim 粘贴代码时会有缩进错乱,原因是终端下的 Vim 是通过模拟用户输入来完成粘贴操作,所以缩进就错乱了。解决方法是每次粘贴前 set paste,完成后 set nopaste,嫌麻烦的话可以设置一个快捷键来切换 paste 状态 set pastetoggle=<F2>.
另外 Vim 下 Ctrl-C 和 ESC 根本不是一码事,Ctrl-C 不会响应 InsertLeave,所以 autocmd InsertLeave * setlocal nopaste 在 Ctrl-C 时是不会执行的。
Git 新建无历史记录分支
git checkout --orphan NEW_BRANCH_NAME
在代码开源分发等时候往往需要去掉不必要的历史记录,这种新分支方式会很方便。
Mosh - Better SSH
Mosh 相比 SSH 的优点:
- 网络中断、切换后自动重连。
- 屏幕输入及时回显。
服务器需要先安装 mosh-server,开启 60000-61000 端口,本地通过 SSH 登录服务器,然后 UDP 连接服务器 mosh-server。
The most effective debugging tool
The most effective debugging tool is still careful thought, coupled with judiciously placed print statements. by Brian Kernighan
退出无响应的 SSH 连接
SSH 经常会因为网络中断、电脑休眠等原因中断无响应,完全无法 Ctrl+C 等方式退出。简单粗暴的解决方法就是直接关闭当前终端重开,更为优雅的方式是用 ~. 断开,适用于正常和无响应的 SSH 连接。
Fucking Stupid Error
今天修改代码部署后造成线上服务出现严重错误,记一下这个教训。
function f1(user)
	local name = user:get('name')
	--
end

function f2(new_user)
	local name = user:get('name')
	--
end
出错原因:两个功能几乎一样的方法都要追加获取同一信息,f1 中获取正常;然后 复制 到 f2 中,如上代码,f2 根本没有 user,取值必然失败,但是由于 Lua 语言特性,这里 user 会被认为是一个全局变量,因此不存在语法等错误,只会在运行时报错,因为全局变量里也没有 user。
这次出错完全是自己疏忽大意造成的。
教训:
- 即使是同样功能代码在不同地方用的时候也要再次确认正确性。
- Lua 代码要杜绝全局变量,每次提交部署前要用 ZeroBraneStudio 进行分析检测,这次完全是大意而忘掉了检查。
- 线上服务代码修改尽量多人 review。
- 更新部署后出错,首先要怀疑最近提交的代码,并进行严格审查。今天出错后也第一时间 review 了代码改动,确认 f1 没问题后对 f2 的检查就放松了,非常不应该。
- 应该回滚代码以优先保证线上服务正常。由于出错的不规律性,加上 review 代码的盲目自信,也确实是很简单的改动,就以为不是这个改动才引起的问题,所以没有及时回滚代码,很影响问题排查。
- 出错后要尽量多的查看所有日志,以便定位问题。今天只检查了 nginx error.log, 忘记了 moochine log,再加上出错栈信息的误导,以为是另一个问题,思路完全跑偏。如果能及时看一下 moochine log 肯定可以很快解决。
- 分析错误的时候思路要开阔,不要被某一个错误 log 牵着走,很有可能这个 log 只是其他问题引发的一个表象。
- 自己一个人排查不定的时候尽快找其他人帮忙,其他人不会受自己思路影响,避免干扰,方便定位错误。这个算是今天唯一做对的一点。
是以为记。
salary
当一个人觉得自己还有特别大进步空间的时候,说明他的薪水也还有特别大的进步空间。by @Linn
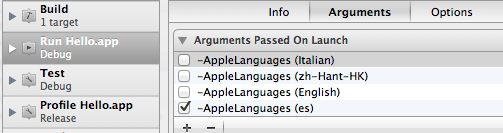
通过 Xcode 启动参数测试 App 本地化
以往测试 App 本地化就是通过切换系统语言来做,甚是麻烦,其实可以用 Xcode 启动参数强制 App 用指定语言:
-AppleLanguages (en)
-开头,Applelanguages 后有一空格,语言放在括号内。- 语言可以用全名或简写均可,比如 English == en,不区分大小写。
- 必须通过 Xcode 启动才有效,模拟器和真机设备都支持。
添加参数方法: Product > Scheme > Edit Scheme (or ⌘<), Arguments Passed On Launch 下添加。可以添加多个方便切换:
Vim open multiple files
vim -p file1 file2 ...
vim -o file1 file2 ...
vim -O file1 file2 ...
其中 -p 是在 tab 打开,-o 是在上下 split 打开,-O 是在左右横向 split 打开。via Vim open multiple files.
coderwall 有很多小技巧,包括编程语言、工具、系统等等,可以多多关注。